 Save
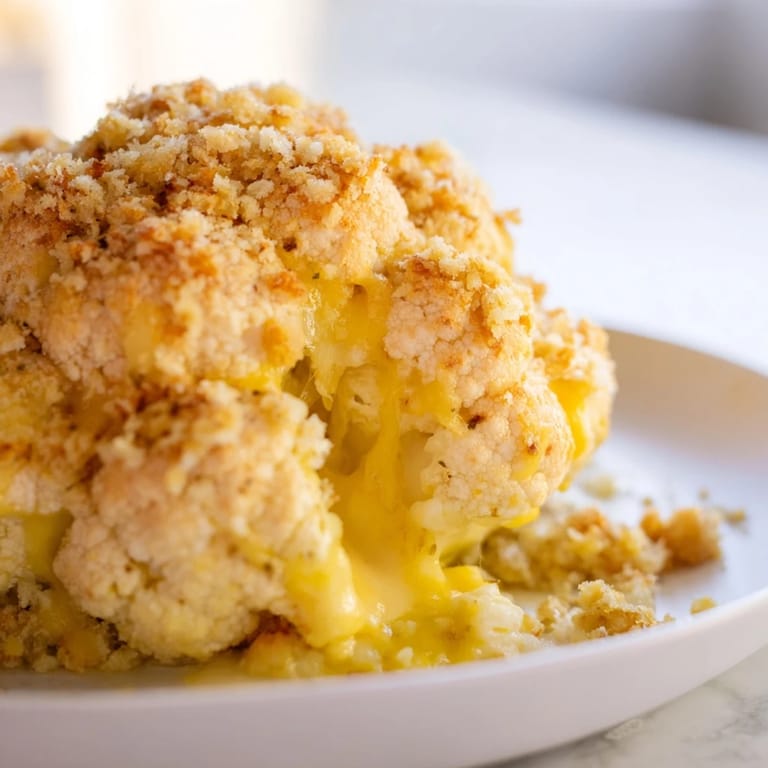
Save The first time I brought this to a dinner party, my friend actually asked if I'd secretly ordered it from a restaurant. There's something undeniably impressive about presenting a whole golden cauliflower at the table, still steaming and bubbling with cheese. I discovered this recipe during a phase where I was trying to make vegetables feel like a proper celebration rather than an afterthought. Now it's become my go-to when I want to serve something that looks spectacular but doesn't require restaurant-level technique.
Last winter, my sister was recovering from surgery and couldn't eat heavy meats, so I brought over one of these cauliflowers. She texted me later that night saying it was the first thing in weeks that actually made her feel excited about dinner. There's something about the way the roasted cauliflower develops that nutty sweetness, while the cheese mixture seeps into every little crevice, that transforms a humble vegetable into something worth savoring slowly.
Ingredients
- 1 large whole cauliflower: Pick one that feels heavy for its size and has tight, compact florets—the sturdier the head, the better it holds up during roasting
- 1 tbsp olive oil: This helps the exterior develop those gorgeous golden edges that add depth to every bite
- ½ tsp salt and ¼ tsp black pepper: Simple seasoning that lets the cauliflower's natural sweetness shine through
- 150 g cream cheese: The secret to a filling that stays creamy instead of separating during the long bake time
- 100 g shredded mozzarella: Creates those irresistible cheese pulls that everyone photographs for social media
- 50 g grated Parmesan: Adds a salty, umami-rich backbone that makes the filling taste properly complex
- 2 tbsp chopped fresh chives: Bring a mild onion flavor that cuts through all that richness
- 1 garlic clove, minced: One clove is enough to echo through without overwhelming the delicate cauliflower flavor
- ½ tsp smoked paprika and ¼ tsp ground nutmeg: This unlikely pair became my favorite discovery—the smokiness and warmth make the cheese taste much more sophisticated
- 1 tbsp milk: Just enough to loosen the filling so you can actually work it into all those tight spaces
- 50 g shredded cheddar cheese: Forms the crispy, golden crust that makes this dish unforgettable
- 2 tbsp breadcrumbs and 1 tbsp melted butter: The butter-soaked crumbs create texture that contrasts beautifully with the tender cauliflower beneath
Tired of Takeout? 🥡
Get 10 meals you can make faster than delivery arrives. Seriously.
One email. No spam. Unsubscribe anytime.
Instructions
- Get your oven ready:
- Preheat to 200°C (400°F) and line a baking tray with parchment paper so cleanup becomes non-negotiably easy
- Prep the cauliflower:
- Trim off the outer leaves and slice just enough from the base to make it sit flat without cutting into the florets themselves
- Par-boil the head:
- Boil a large pot of salted water, submerge the cauliflower completely, and cook for 8 to 10 minutes until it yields slightly when you press it with a finger
- Make the filling:
- Combine cream cheese, mozzarella, Parmesan, chives, garlic, smoked paprika, nutmeg, and milk until you have a smooth, spreadable mixture
- Create space for the cheese:
- Let the cauliflower cool enough to handle, then use a small knife to make deep cuts into the base and between florets—this is where all that flavor will hide
- Stuff it generously:
- Work the cheese mixture into every crevice and the center cavity, using your fingers or a spoon to press it in firmly
- Season the exterior:
- Brush the entire head with olive oil and sprinkle with salt and pepper—this simple step creates that restaurant-quality roasted flavor
- Add the crispy topping:
- Mix cheddar cheese with breadcrumbs and melted butter, then scatter it evenly over the cauliflower
- Roast until golden:
- Bake for 40 to 45 minutes until the surface is deeply golden, the cheese is bubbling, and a knife slips easily through the thickest part
- Let it rest briefly:
- Wait 5 minutes before slicing into wedges—this short rest makes all the difference for clean, presentable pieces
 Save
Save My father-in-law, who's typically a meat-and-potatoes purist, took one bite and asked if I could make this for every family gathering from now on. That's when I realized this wasn't just another vegetarian recipe—it's the kind of dish that wins people over simply by being delicious on its own terms.
Making It Your Own
Sometimes I add chopped sun-dried tomatoes or sautéed mushrooms to the cheese filling when I want deeper umami flavor. Fresh herbs are equally flexible—parsley or dill work beautifully if chives aren't your thing. The beauty of this recipe is how well it adapts to whatever you have on hand while still feeling like something special.
Serving Suggestions
A crisp green salad with a sharp vinaigrette cuts through the richness perfectly. I've also served it alongside roasted root vegetables or simple crusty bread for a more substantial meal. It's hearty enough to stand alone as a vegetarian main, but also plays nicely as a stunning side dish alongside roasted chicken or grilled fish.
Make-Ahead Wisdom
You can assemble the entire stuffed cauliflower up to a day ahead and keep it covered in the refrigerator. When you're ready to bake, just add a few extra minutes to the cooking time since it will be starting from cold.
- Make sure the cauliflower is completely cool before stuffing it, or the filling will slide right off
- If the top starts browning too quickly, tent it loosely with foil for the last 10 minutes
- Leftovers reheat surprisingly well in a 180°C (350°F) oven for about 15 minutes
 Save
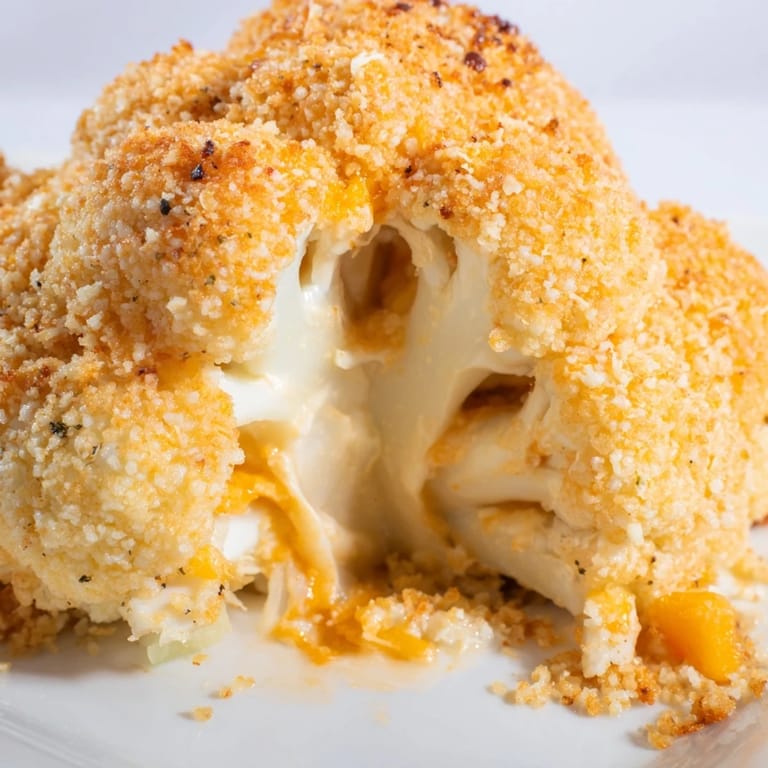
Save There's something deeply satisfying about turning a simple cauliflower into a dish that makes people pause their conversation and pick up their phones. That's the kind of cooking I want more of in my life.
Recipe Questions
- → How do I know when the cauliflower is done baking?
The cauliflower is ready when it's golden brown on top, the cheese is bubbling, and a knife inserted into the center meets no resistance. This typically takes 40–45 minutes at 200°C.
- → Can I prepare this dish ahead of time?
Yes, you can par-boil the cauliflower and prepare the cheese filling up to a day in advance. Store them separately in the refrigerator. Stuff and bake just before serving for the best texture and flavor.
- → What can I use instead of cream cheese in the filling?
You can substitute cream cheese with mascarpone for a milder flavor, or use a blend of Greek yogurt and shredded cheese for a lighter version. The filling will still be creamy and delicious.
- → Is this suitable for gluten-free diets?
Absolutely. Simply use gluten-free breadcrumbs for the topping, and this entire dish becomes completely gluten-free while maintaining all its cheesy, crispy appeal.
- → How should I store and reheat leftovers?
Store leftover wedges in an airtight container in the refrigerator for up to 3 days. Reheat in a 180°C oven for 10–15 minutes to restore the crispy topping, or microwave briefly for a softer texture.
- → Can I add other ingredients to the cheese filling?
Certainly. Chopped sun-dried tomatoes, sautéed mushrooms, crispy bacon bits, or fresh herbs like rosemary or thyme work wonderfully. Just keep additions roughly chopped so they don't interfere with the stuffing process.